This post may contain affiliate links. Please see our disclosure policy.
Learn how to make a show stopping fresh fruit charcuterie board that’s perfect for your next party! It’s a visually stunning and delicious way to serve and display a variety of fruits. Whether you’re entertaining a large crowd or hosting a small dinner party, this easy recipe is the perfect way to enjoy a variety of colorful fruits! Pair with a cream cheese fruit dip or whipped cream for the ultimate fruit board.
Need more charcuterie board ideas? Try this Brunch Board, Charcuterie Skewers, or Summer Cheese Board!
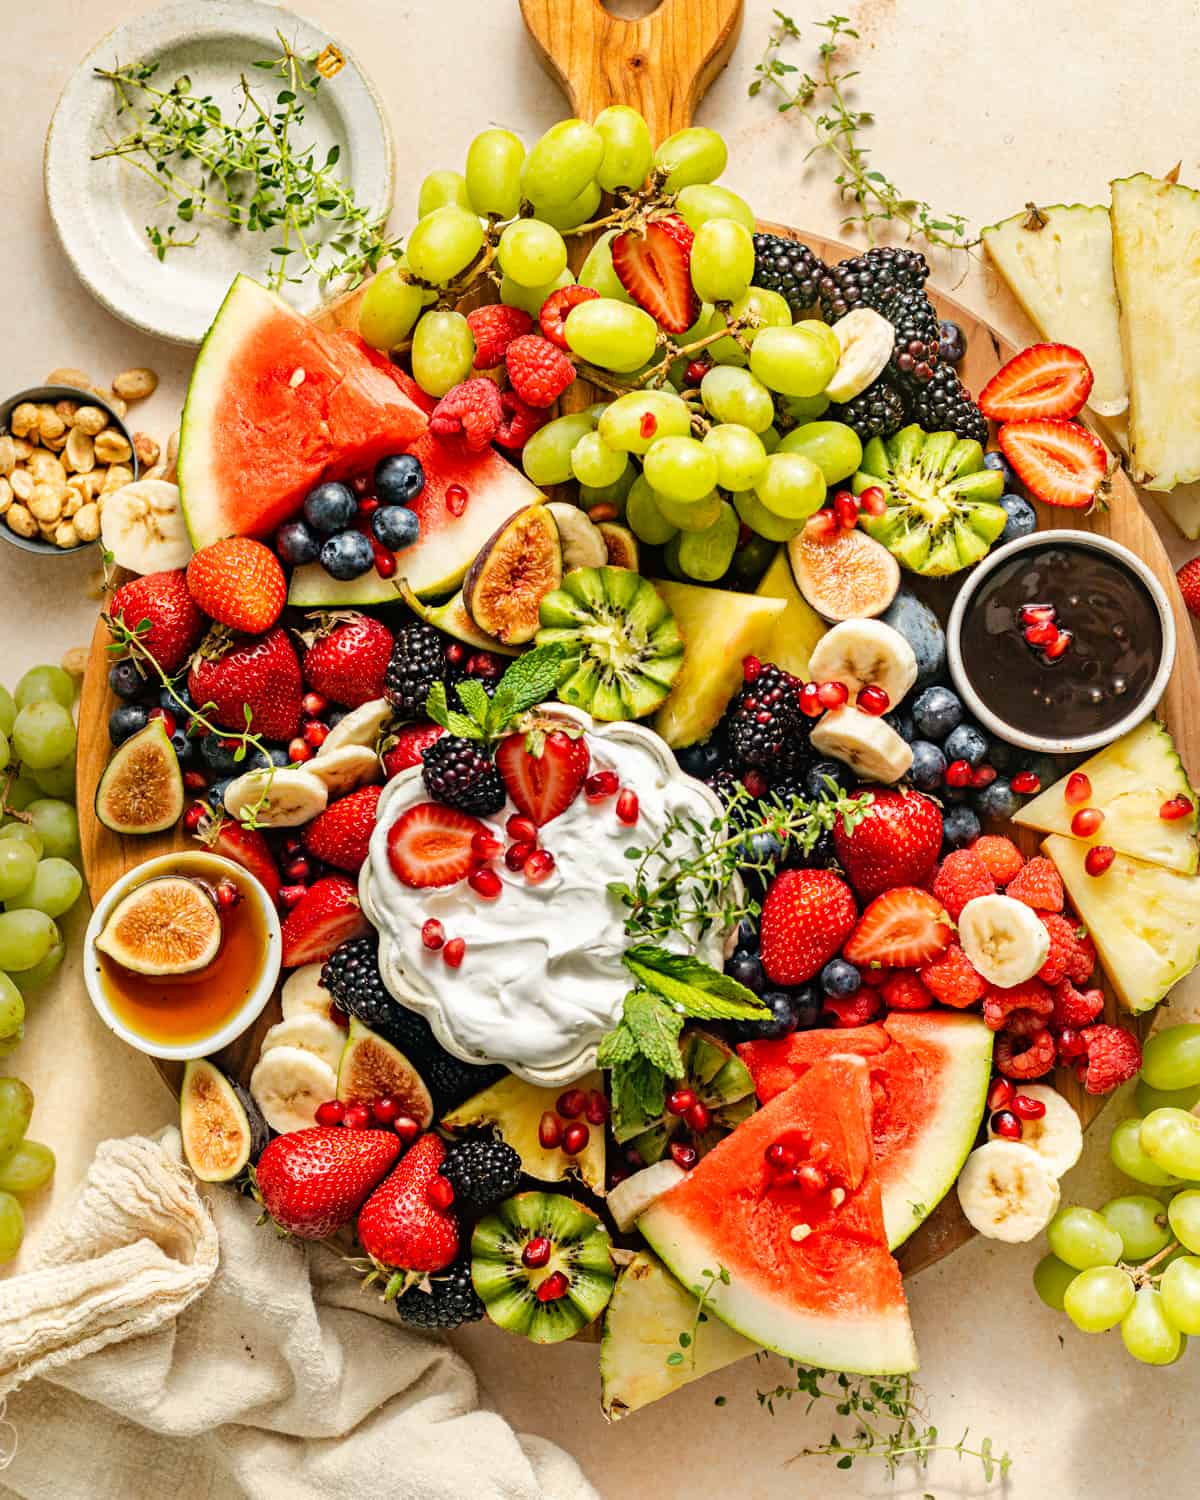
Table of Contents
Since it’s almost summer, I’m always looking for different ways to entertain guests. We live pretty far from family so it’s nice to have something delicious waiting for them when they make the long drive to visit. My go to is always a good charcuterie board with a variety of my favorite cured meats, a variety of cheeses, nuts, and fruits. BUT this time, I’m switching it up.
Now naturally, this is not your classic charcuterie board. It’s a play on the traditional meat-based charcuterie board, but instead of cured meats and cheeses, it’s made up of a variety of fresh fruits, dried fruits, nuts, and other complementary items.
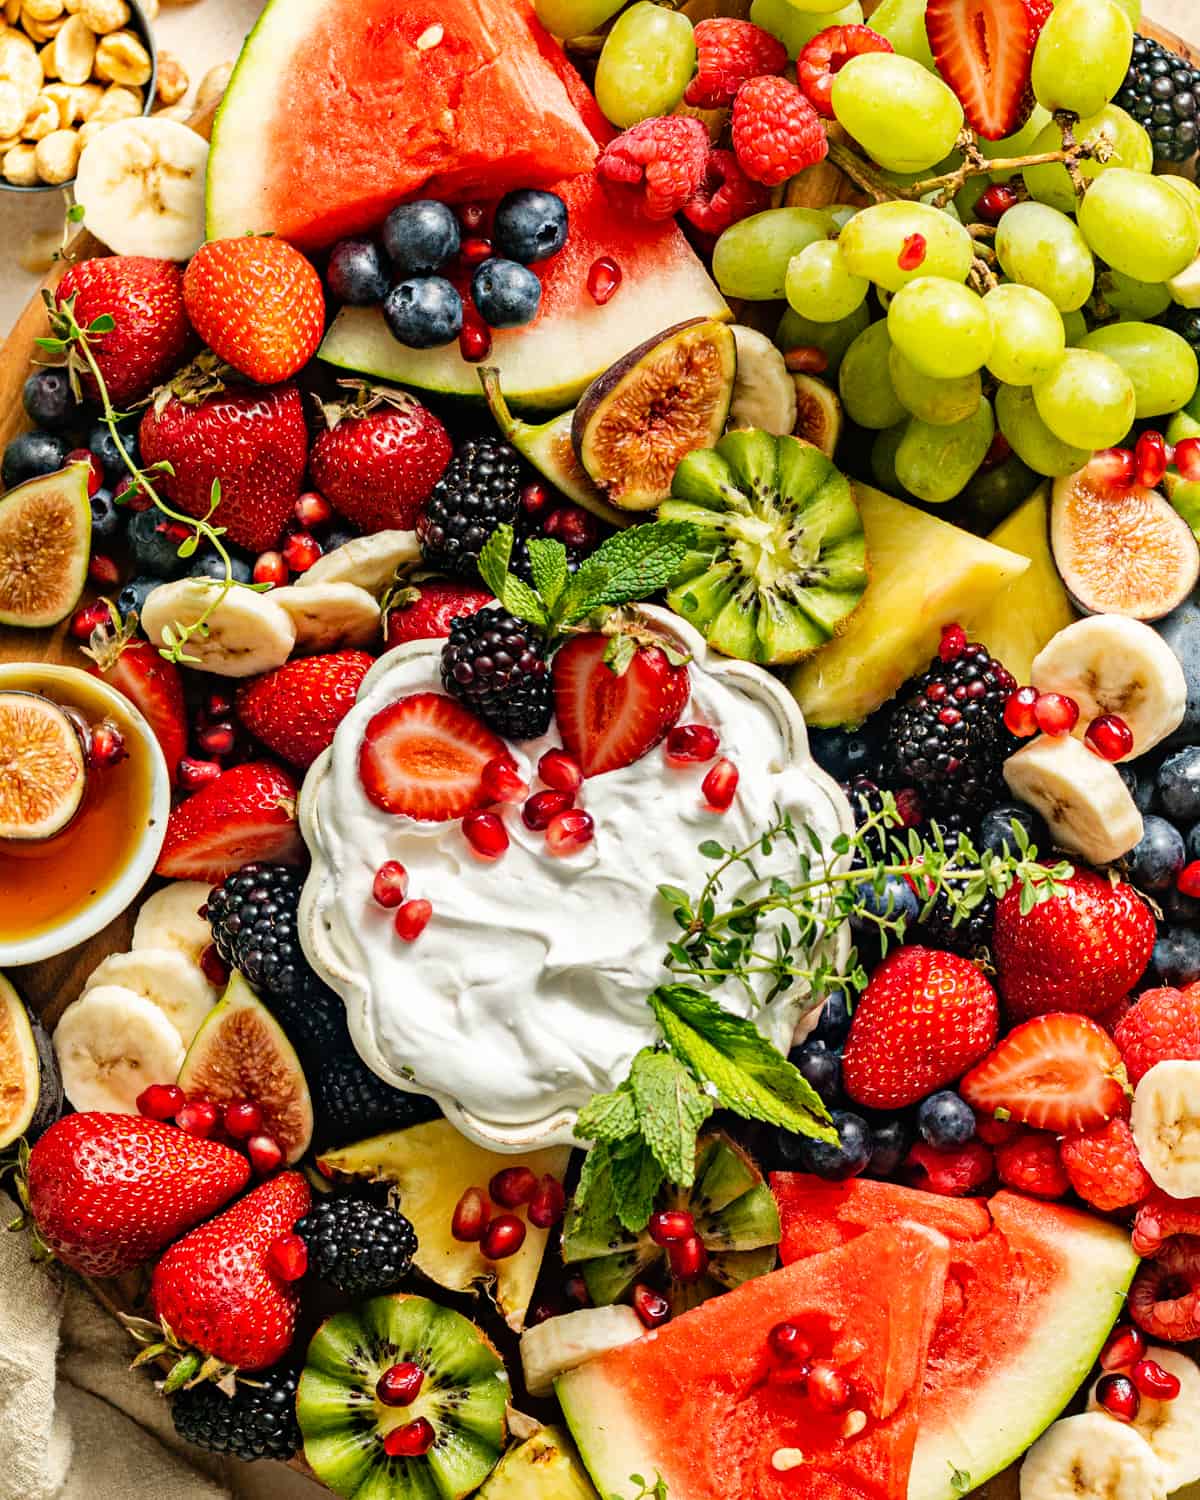
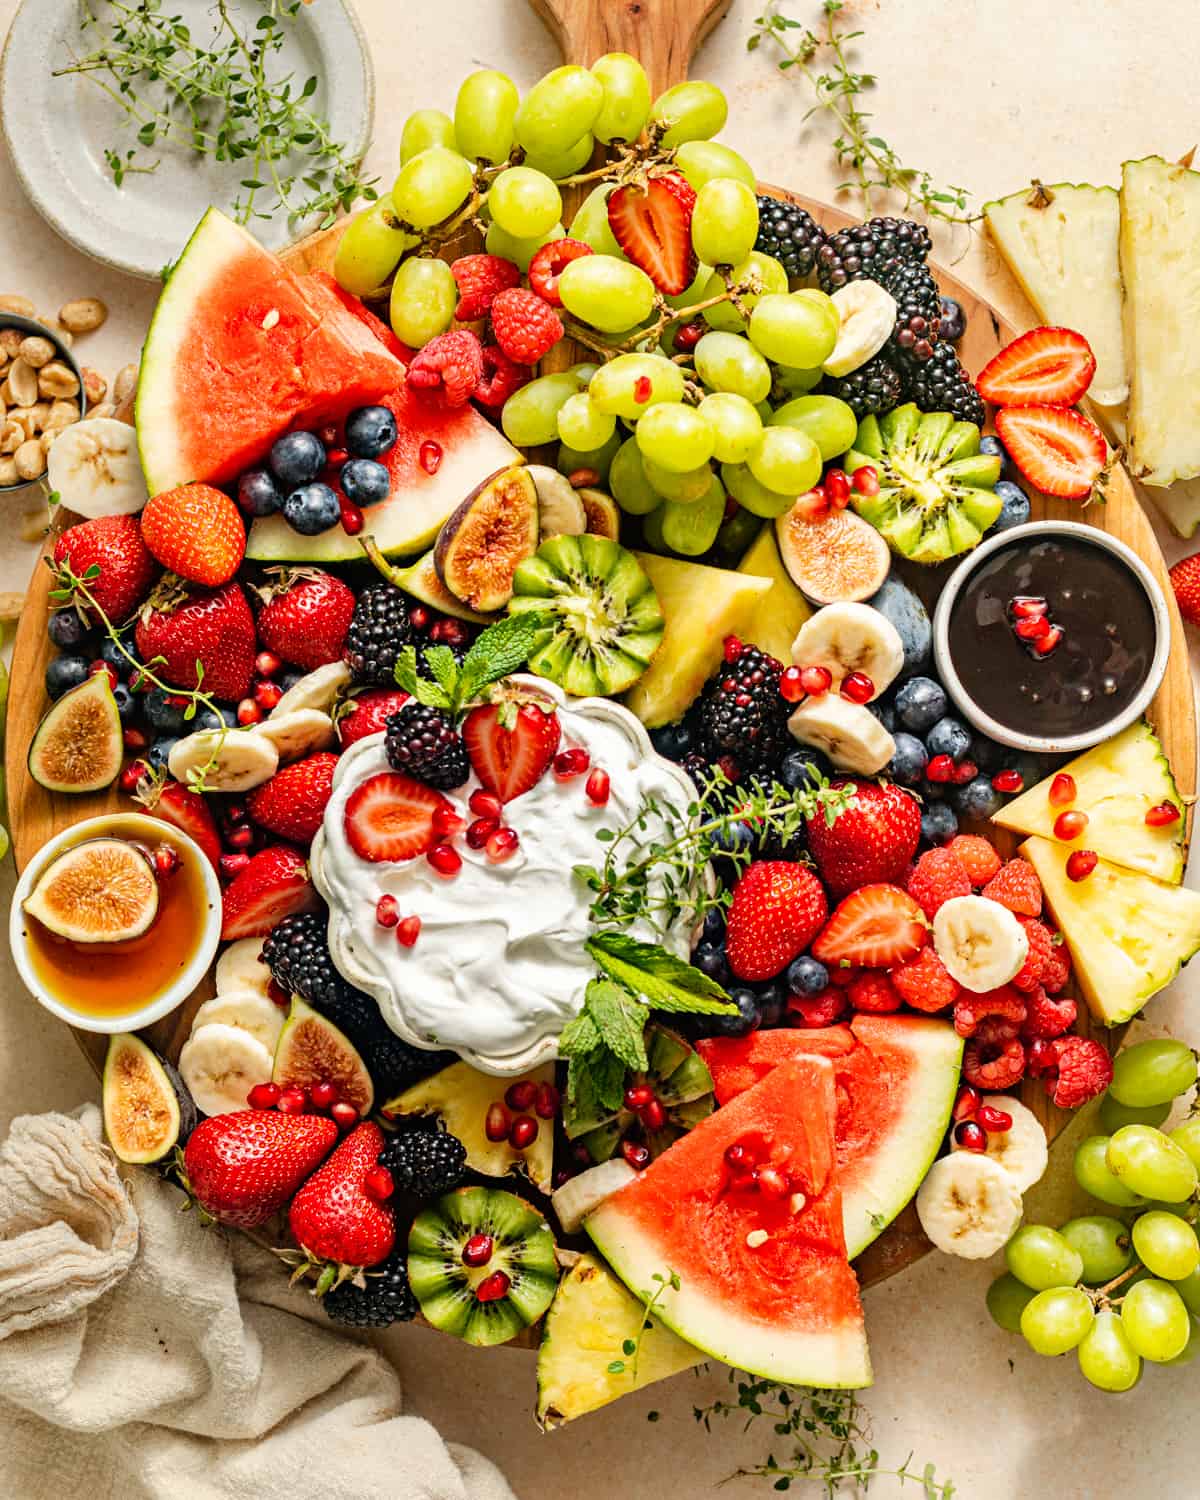
A typical fruit charcuterie board includes a variety of fresh fruits, such as strawberries, grapes, melons, pineapples, and citrus fruits, as well as dried fruits like apricots, figs, and dates. Nuts, such as almonds, pistachios, and cashews, can be included for added texture and flavor.
Other complementary items such as crackers, pretzels, chocolate, and honey may also be added to the board.
When entertaining, a fruit tray is a great option for entertaining guests or as a healthy and delicious snack option for baby showers, dinner parties, or even date night!
What do you put on a fruit board?
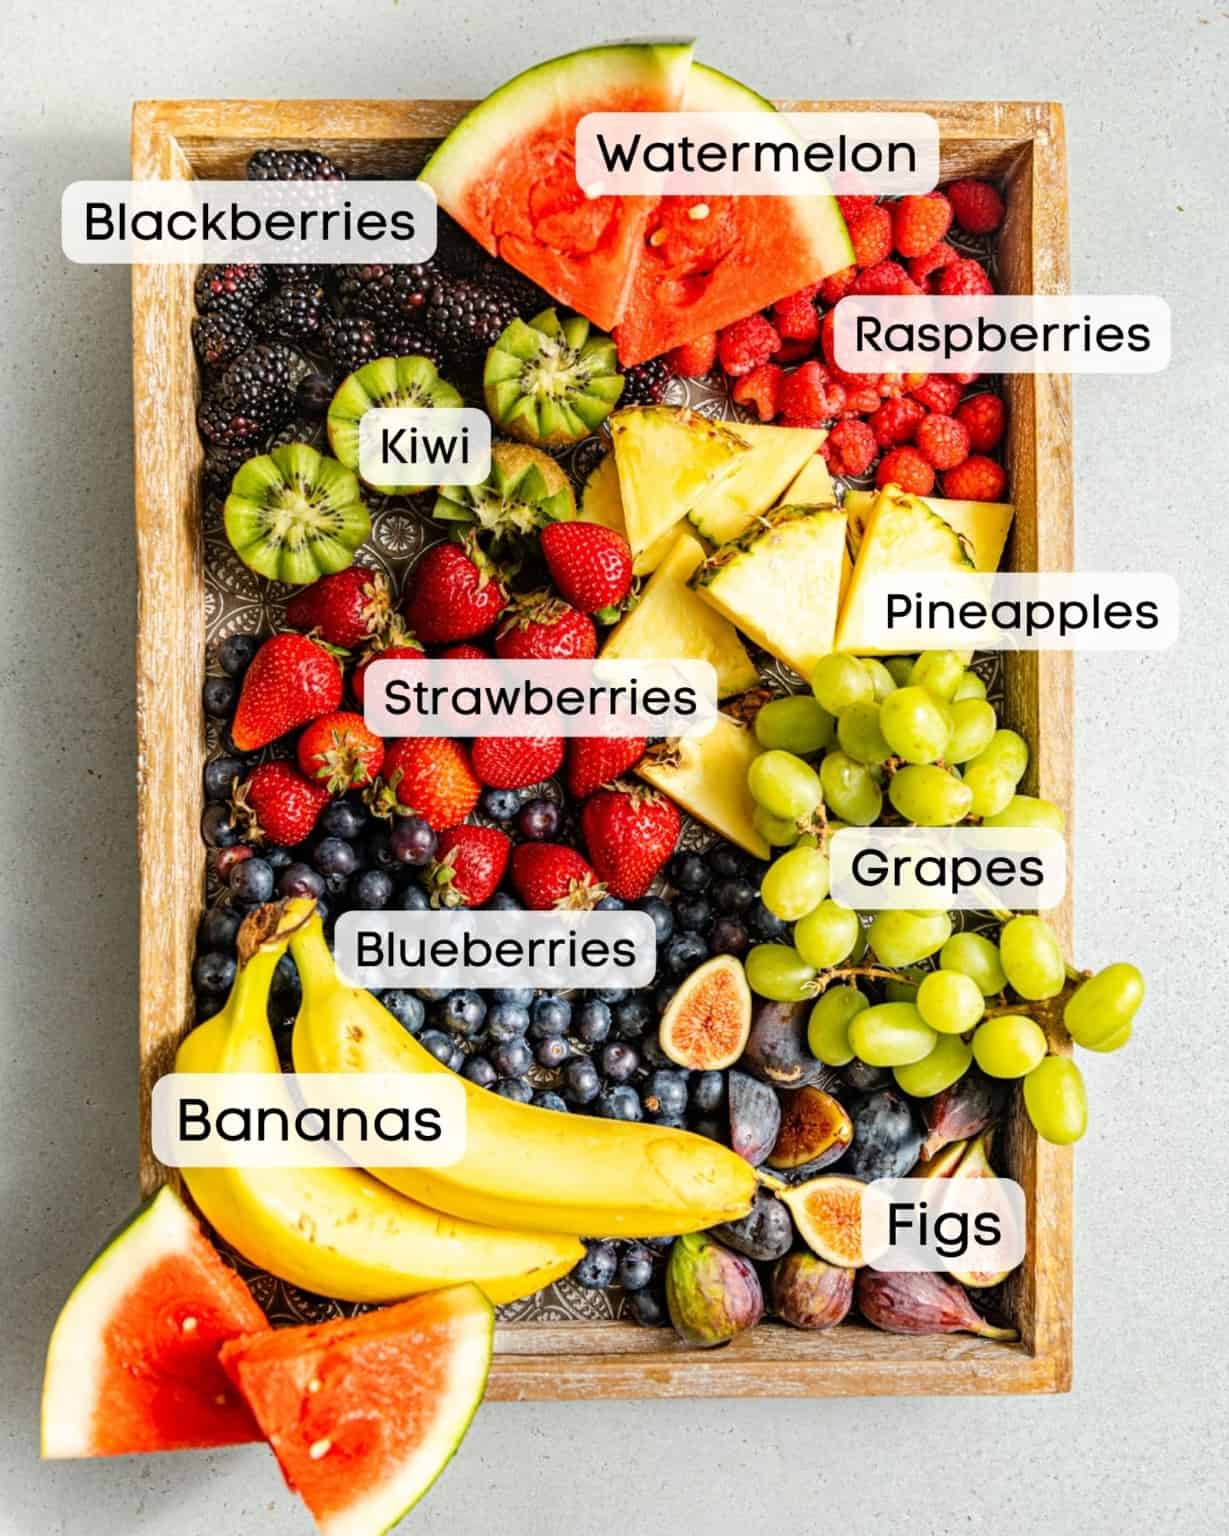
A fruit board typically includes a variety of fresh fruits that are cut into bite-sized pieces or arranged in clusters. The key to a beautiful fruit charcuterie board is to arrange the items in an aesthetically pleasing way, with an emphasis on color, texture, and variety. PRO TIP: Use ripe fruit, especially seasonal fruits! You can combine your favorite fruits and fruit dips too! Here are some fruits you can include on a fruit board:
- Berries (strawberries, raspberries, blueberries, blackberries)
- Melons (watermelon, honeydew, cantaloupe)
- Grapes (red, green, or black)
- Citrus fruits (orange slices, mandarins, grapefruit)
- Figs (I was so excited when I found these at Trader Joe’s!)
- Pineapple
- Kiwi
- Mango
- Papaya
- Pears
- Apple Slices
- Lemon Juice (this is a pro tip to simply to prevent your fruit from browning while it’s sitting out)
- Nuts (almonds, pistachios, cashews, walnuts)
- Dried fruits (apricots, figs, dates, raisins)
- Soft Cheese (small cubes or slices)
To give your fresh fruit board a nice touch, you can add some decorative touches such as fresh mint leaves, edible flowers, or even some small crackers. Remember to arrange the fruits in clusters or piles, and to alternate colors and textures for a more visually appealing display.
Dips for Charcuterie Boards
Include a few dips to complement the fruits, such as:
- Homemade cream cheese fruit dip (always a good choice)
- Yogurt Dip or Honey
- Chocolate or caramel sauce for dipping
- Peanut Butter
You can also use cool whip, nutella, and whipped cream too!
Tips
These tips give you the tools to create an attractive and delicious fruit tray that will impress your guests and provide a healthy and refreshing snack option!
- Choose a variety of fruits: Select a variety of colorful and ripe fruits to include on your fruit tray. Consider using seasonal fruits for the freshest and most flavorful options.
- Cut the fruit just before serving or cover until you’re ready to serve!
- Arrange the fruit attractively: Arrange the fruit attractively on the tray, using different colors and textures for a visually appealing display. You can arrange the fruit in piles, clusters, or in a pattern.
- Use a sturdy tray: Use a sturdy tray or platter that can support the weight of the fruit and won’t warp or bend under the weight.
- Keep the fruit chilled: Keep the fruit chilled until serving time to help keep it fresh and prevent it from spoiling.
- Provide small bowls for dipping! A dipping sauce, such as a yogurt or chocolate dip, can be a tasty addition to a fruit tray.
How do you cut fruit for a charcuterie board?
When cutting fruit for a charcuterie board, it’s important to cut the fruits into bite-sized pieces. Here are some tips for cutting fruit for a charcuterie board:
1. Cut into uniform shapes and sizes: Try to cut the fruit into uniform shapes and sizes, such as cubes, wedges, or slices. This will make it easier to arrange the fruit on the board and create a visually appealing display.
2. Remove any seeds or pits: For fruits like melons, remove the seeds or pits before cutting into bite-sized pieces.
3. Peel the fruit if necessary: For fruits like kiwi, pineapple or mango, you may need to peel them before cutting.
4. Arrange the fruit in piles or clusters: Once you have cut the fruit into bite-sized pieces, arrange them in piles or clusters on the charcuterie board. Alternate colors and textures to create a visually appealing display.
Remember to be careful when cutting the fruit, especially if using sharp knives, and take your time to ensure that each piece is cut neatly and precisely.
How to make a Fruit Tray
- Choose a platter or board: Select a board or platter that’s large enough to hold all of the fruits and accompaniments you plan to include. A wooden board or a slate platter is a great option for a rustic look.
- Select your fruits: Choose a variety of colorful fruits to include on your board, such as berries, melons, grapes, citrus, kiwi, pineapple, and other tropical fruits. You can also add dried fruits like apricots, figs, or dates, or even some fresh veggies like cucumber or carrots.
- Prep your fruits: Wash and dry your fruits, and then slice, dice or cut them into bite-sized pieces. Arrange them in piles or clusters on the board, alternating colors and textures to create a visually appealing display.
- Add accompaniments: Consider adding some accompaniments to complement the fruits, such as nuts, seeds, granola, yogurt dips, honey, or chocolate.
- Final touches: Add some decorative touches like fresh mint leaves, edible flowers, or even some small cheese cubes or crackers.
- Serve and enjoy: Serve your fruit charcuterie board immediately, and encourage your guests to mix and match a variety of flavors.
How do you keep fruit from turning brown on a charcuterie board?
Fruits can turn brown when they are exposed to air, which causes the enzymes in the fruit to react and turn the fruit brown. Here are some ways to prevent fruit from turning brown on a charcuterie board:
1. Cut the fruit just before serving: If possible, cut the fruit just before serving and arranging it on the charcuterie board. This will minimize the amount of time the fruit is exposed to air.
2. Add lemon juice or other acidic liquids: Lemon juice is acidic, and can help prevent fruits from turning brown. Orange juice or pineapple juice can also be used. Simply sprinkle a little lemon juice over the fruit, or toss the fruit in a bowl with a little lemon juice before arranging it on the charcuterie board.
3. Cover the fruit: If you need to cut the fruit in advance, cover it with plastic wrap or store it in an airtight container until you are ready to arrange it on the charcuterie board.
By using these methods, you can help prevent your fruit from turning brown and keep your charcuterie board looking fresh and appealing for longer!
Making Ahead and Storing Leftovers
Making ahead: I recommend making your fruit tray just before serving, however, this can be prepped up to 24 hours in advance. A great way to keep the fruit fresh is to covered with plastic wrap once assembled on the board. You can also pre-cut the fruit and store in an airtight container in the refrigerator and assemble when you’re ready to serve.
Storing Leftovers: store any extra fruit in the refrigerator in an airtight container.
FAQs
Grapes, berries, melons, pineapples, figs, citrus fruits, and apples are all commonly used on charcuterie boards. These fruits tend to pair well with charcuterie items.
The best charcuterie board for you will depend on your personal preferences, the size of your gathering, and the type of food you are serving. Choose a board that is both functional and aesthetically pleasing, and that will help you create a delicious spread for your guests.
The cost of a fruit tray versus making your own can vary depending on a few factors, such as the type of fruit, the quantity of fruit, and the location. In general, buying a pre-made fruit tray may be more expensive than making your own because of the convenience factor.
More Charcuterie Board Ideas
Check out more beautiful boards to serve for special occasions!

Desserts
Dessert Charcuterie Board

Appetizers
Halloween Charcuterie Board

Breakfast
Breakfast Charcuterie Board

Appetizers
Fall Charcuterie Board
Want more delicious and beautiful recipes? Subscribe to my newsletter to receive the latest seasonal creations as soon as they’re released!
If you make this recipe, please leave a star rating on the recipe card and comment below! You can also tag @BritneyBreaksBread on Instagram and hashtag #britneybreaksbread so I can celebrate your beautiful creations!
Fruit Charcuterie Board

Equipment
- Wooden Board
- Cutting board
- Small bowls for dips (optional)
Ingredients
- 1 lb Green Grapes
- 1 Pineapple
- 1 Watermelon
- 1 pint Strawberries
- 1 pint Blueberries
- 1 pint Blackberries
- 1 pint Raspberries
- 2 Bananas, (sliced)
- 1 Apples, (sliced)
- 3 Kiwis
- 1 pint Figs, (optional)
- 3 tbsps Honey, (optional)
Instructions
- Prep your fruits: Wash and dry your fruits, and then slice, dice or cut them into bite-sized pieces.
- Arrange them in piles or clusters on the board, starting with the larger items first – grapes, then pineapple and watermelon slices, thn strawberries. Alternate colors and textures to create a visually appealing display.
- If using dips, place dips into bowls and place them onto to the board.
- Fill in spaces with blueberries, blackberries, raspberries, sliced bananas, apple slices, figs, and kiwis.
- Optional: Consider adding some accompaniments to complement the fruits, such as nuts, seeds, granola, yogurt dips, honey, or chocolate. You can also add some decorative touches like fresh mint leaves, edible flowers, or even some small cheese cubes or crackers.
Video
Notes
- Choose a variety of fruits: Select a variety of colorful and ripe fruits to include on your fruit tray. Consider using seasonal fruits for the freshest and most flavorful options.
- Cut the fruit just before serving or cover until you’re ready to serve!
- Arrange the fruit attractively: Arrange the fruit attractively on the tray, using different colors and textures for a visually appealing display. You can arrange the fruit in piles, clusters, or in a pattern.
- Use a sturdy tray: Use a sturdy tray or platter that can support the weight of the fruit and won’t warp or bend under the weight.
- Keep the fruit chilled: Keep the fruit chilled until serving time to help keep it fresh and prevent it from spoiling.
- Provide small bowls for dipping! A dipping sauce, such as a yogurt or chocolate dip, can be a tasty addition to a fruit tray.
Nutrition
Nutrition information is automatically calculated, so should only be used as an approximation.