
This post may contain affiliate links. Please see our disclosure policy.
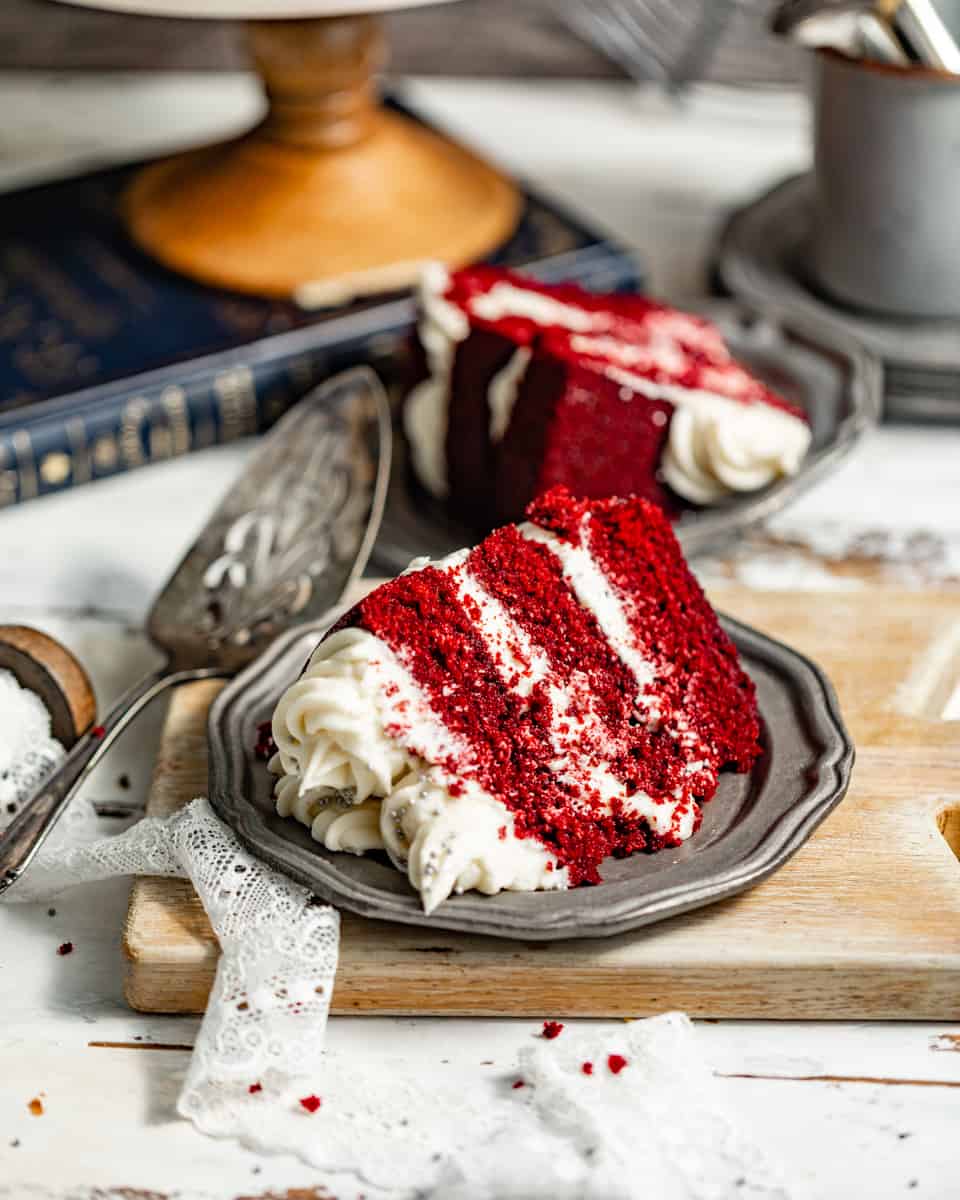
Red Velvet Cake with Cream Cheese Frosting is a velvety-smooth, decadent cake with a moist crumb and incredibly tender texture! It’s topped with a cream cheese frosting that’s creamy and tangy notes which perfectly complement the cake.
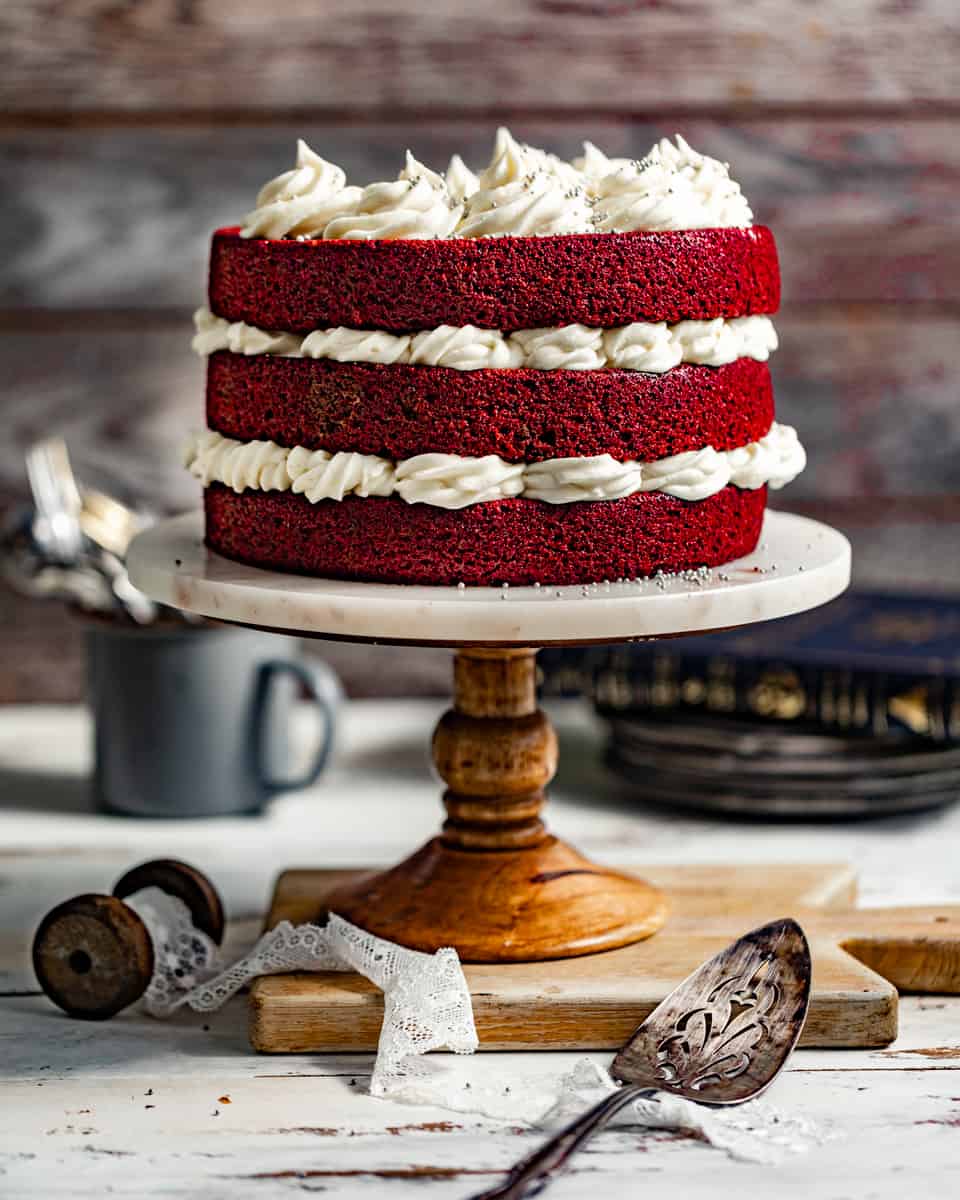
Let me tell you about this classic red velvet cake recipe! It’s soft, plush, and unapologetically moist in the best way. Every bite is tender with just the right hint of cocoa and a subtle tang that makes red velvet so irresistible.
The crumb is velvety (as it should be) and practically melts in your mouth. Then it’s dressed up with cream cheese frosting that adds that tangy, unique flavor that makes red velvet, well, red velvet.
This is the dessert that gets quiet in the room when everyone takes their first bite.
Can’t get enough red velvet recipes? Try my red velvet bundt cake or these red velvet brownies! Also, for a little something different, try this black velvet cake!
Table of Contents
Why This Is The BEST Red Velvet Cake recipe!
- It’s incredibly easy! I made this into a super easy red velvet cake recipe by providing step-by-step instructions so that you can make this cake with your eyes closed! For an even easier version, make my red velvet sheet cake!
- This fluffy cake recipe has a tender crumb, rich chocolate flavor that’s perfectly balanced with vanilla for that authentic red velvet flavor.
- Substitutions are provided so that you can alter this recipe to fit any diet!
- The cream cheese frosting is silky and smooth but also stable enough to pipe and spread onto the cake without becoming runny!
Key Ingredients

(full list of ingredients can be found in the recipe card)
- Dry ingredients: cake flour and baking soda give the cake structure and fluffiness!
- Natural Cocoa powder has a strong chocolate flavor and since there’s only 5 tbsp of cocoa powder in this recipe, I really want the subtle chocolate notes to shine through. You can use dutched cocoa powder, but it won’t have as much flavor.
- Granulated Sugar adds sweetness to the cake without competing with the red velvet cake flavor.
- Salted Butter and Vegetable Oil add moisture, flavor, and air to the batter – giving it the cake it’s super soft texture that stays moist for days!
- Eggs bind everything together and add texture and richness to the cake.
- Buttermilk: Red velvet cake commonly includes buttermilk in the batter. Buttermilk helps to tenderize the crumb and adds moisture, contributing to the cake’s soft and velvety texture. Buttermilk is a mix of whole milk and lemon juice, so if you don’t have any on hand, you can make your own!
- White Vinegar: the combination of white vinegar, cocoa powder, and baking soda creates a chemical reaction that helps the cake rise and adds to its light and fluffy texture. Vinegar also helps to bring out the red color in the food coloring so that you have a vibrant hue to your finished cake! You can also use apple cider vinegar here.
- Red food coloring: I recommend using red gel food coloring for the most vibrant bold red color. Traditionally, red velvet cakes were colored with beet juice, however,
Cream Cheese Frosting
- Softened Cream Cheese – be sure to use full-fat room temperature cream cheese for the best flavor!
- Butter – also, room temperature butter is critical here too. You’ll want to use all room temperature ingredients to ensure a smooth and silky frosting.
- Powdered sugar – this is to provide both sweetness and structure to this super fluffy cream cheese frosting. Add a little at a time for the best results.
- Meringue Powder – optional but highly recommended. Cream cheese frostings tend to be a little less stable than other buttercreams. Meringue powder allows for the frosting to be easily piped onto the cake without becoming runny.
- Vanilla Extract – use a quality vanilla extract, preferably one with vanilla bean seeds (my fave). Pro tip: If you’d like a whiter color for the frosting, use clear vanilla extract or add the tiniest dab of purple food dye to counteract any hues in the buttercream.
Substitutions and Variations
- Buttermilk substitute: to make buttermilk, all you need are milk and lemon juice or vinegar. 1 cup of milk + 1 tbsp of lemon juice, white vinegar, or apple cidr vinegar. Combine the two, let it sit for 5-10 minutes and you’ve got buttermilk.
- Dairy Free Option: use your favorite dairy free milk and add a tablespoon of vinegar to make a nondairy buttermilk. For the frosting, use your favorite non-dairy cream cheese.
- Gluten Free Option: use a 1-to-1 gluten free flour in place of all purpose flour. Use the same quantities listed in the recipe card.
- Vegan Option: follow the dairy free option and also use your favorite vegan butter as well as your favorite egg replacement. I recommend using flax eggs. For this recipe, that would be 4 tbsps of flaxseeds and 10 tbsps of water.
How to get equally sized cake layers
This is my own hack for making sure all of my cake layers are the same size. Simply add a large mixing bowl on top of a kitchen scale and tare. Add the cake batter to the bowl and divide it by the number of cake layers you’ll be making. (For this recipe, that would be three layers) i.e. 1200g of cake batter divided by 3 cake layers is 400g of cake batter per pan.
Remove the bowl from the scale and place a cake pan on top. Tare. Then add the amount of cake batter to each pan. Repeat with remaining cake pans.
It seems like a lot of extra work but it works every single time!
How to make Red Velvet Cake
Prepare the Cake Batter and Bake
Prep: Preheat the oven to 350 degrees F. Spray three 8 inch cake pans with nonstick baking spray. Set aside.

Step 1: In a large mixing bowl, whisk together cake flour, cocoa powder, espresso powder, baking soda and kosher salt. Mix until combined.
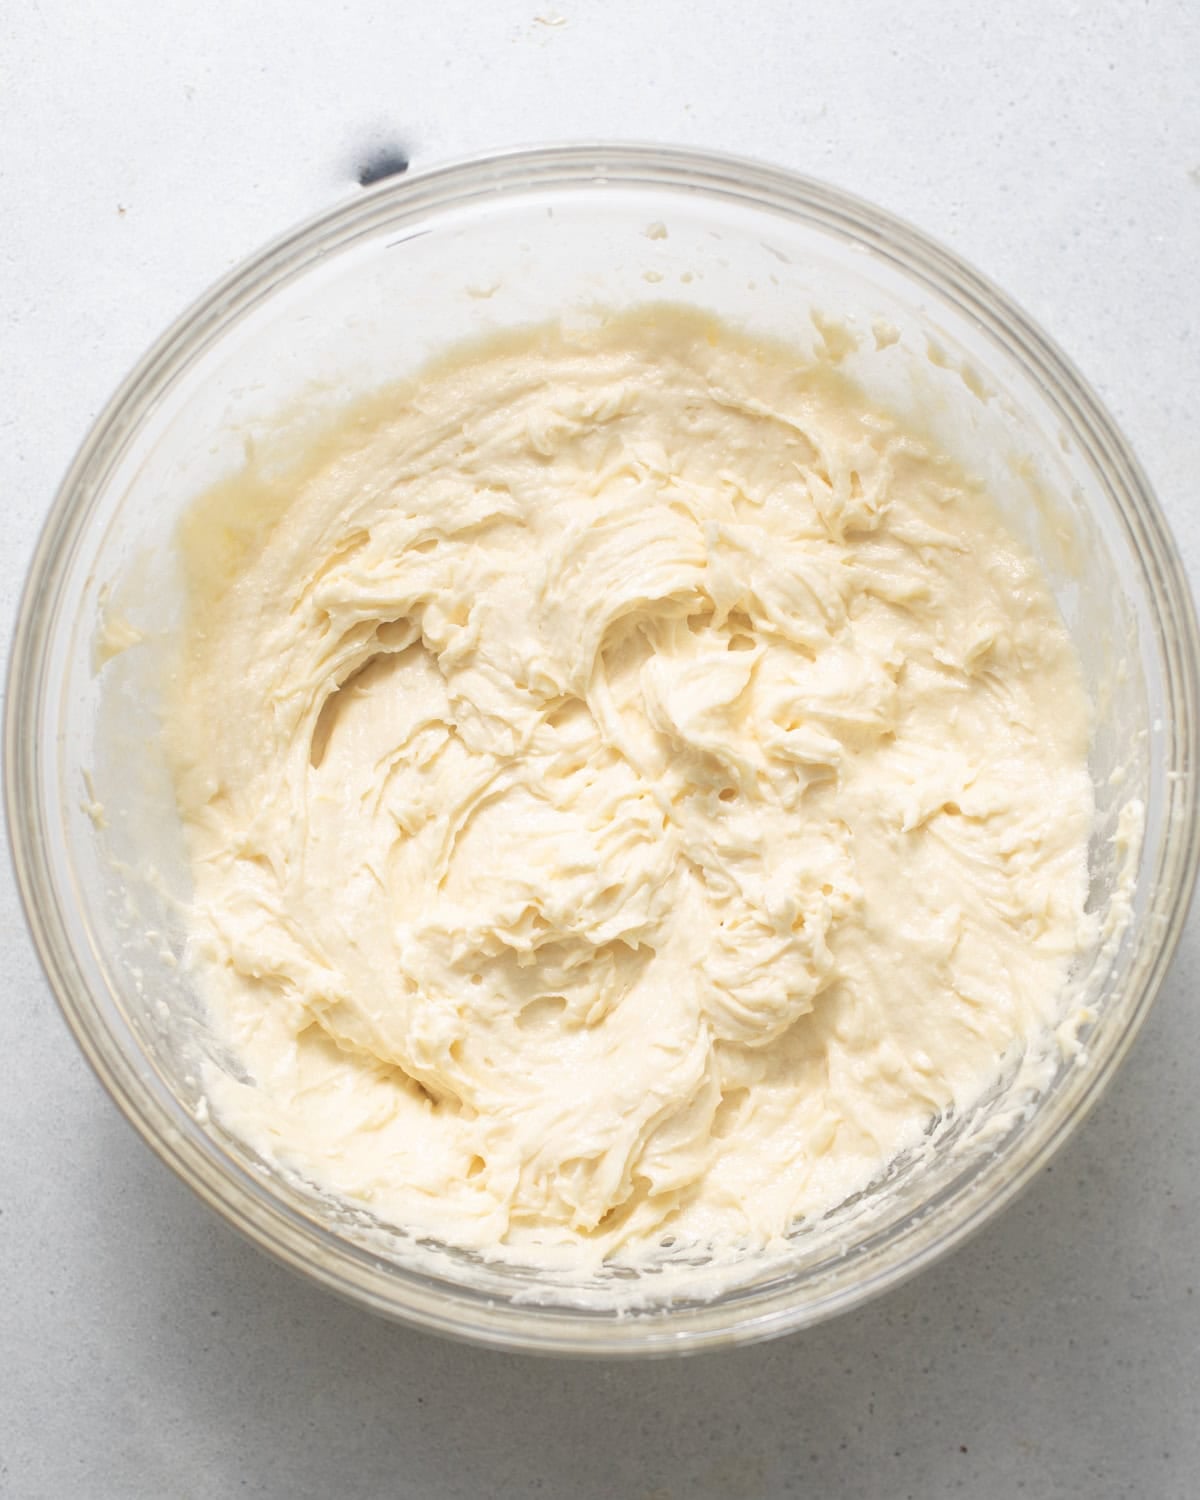
Step 2: In the bowl of a stand mixer, combine room temperature butter, oil, and sugar. Cream everything together until smooth, about 2-3 minutes, then add eggs, one at a time, vanilla extract, butter vanilla emulsion, vinegar, buttermilk, and sour cream.
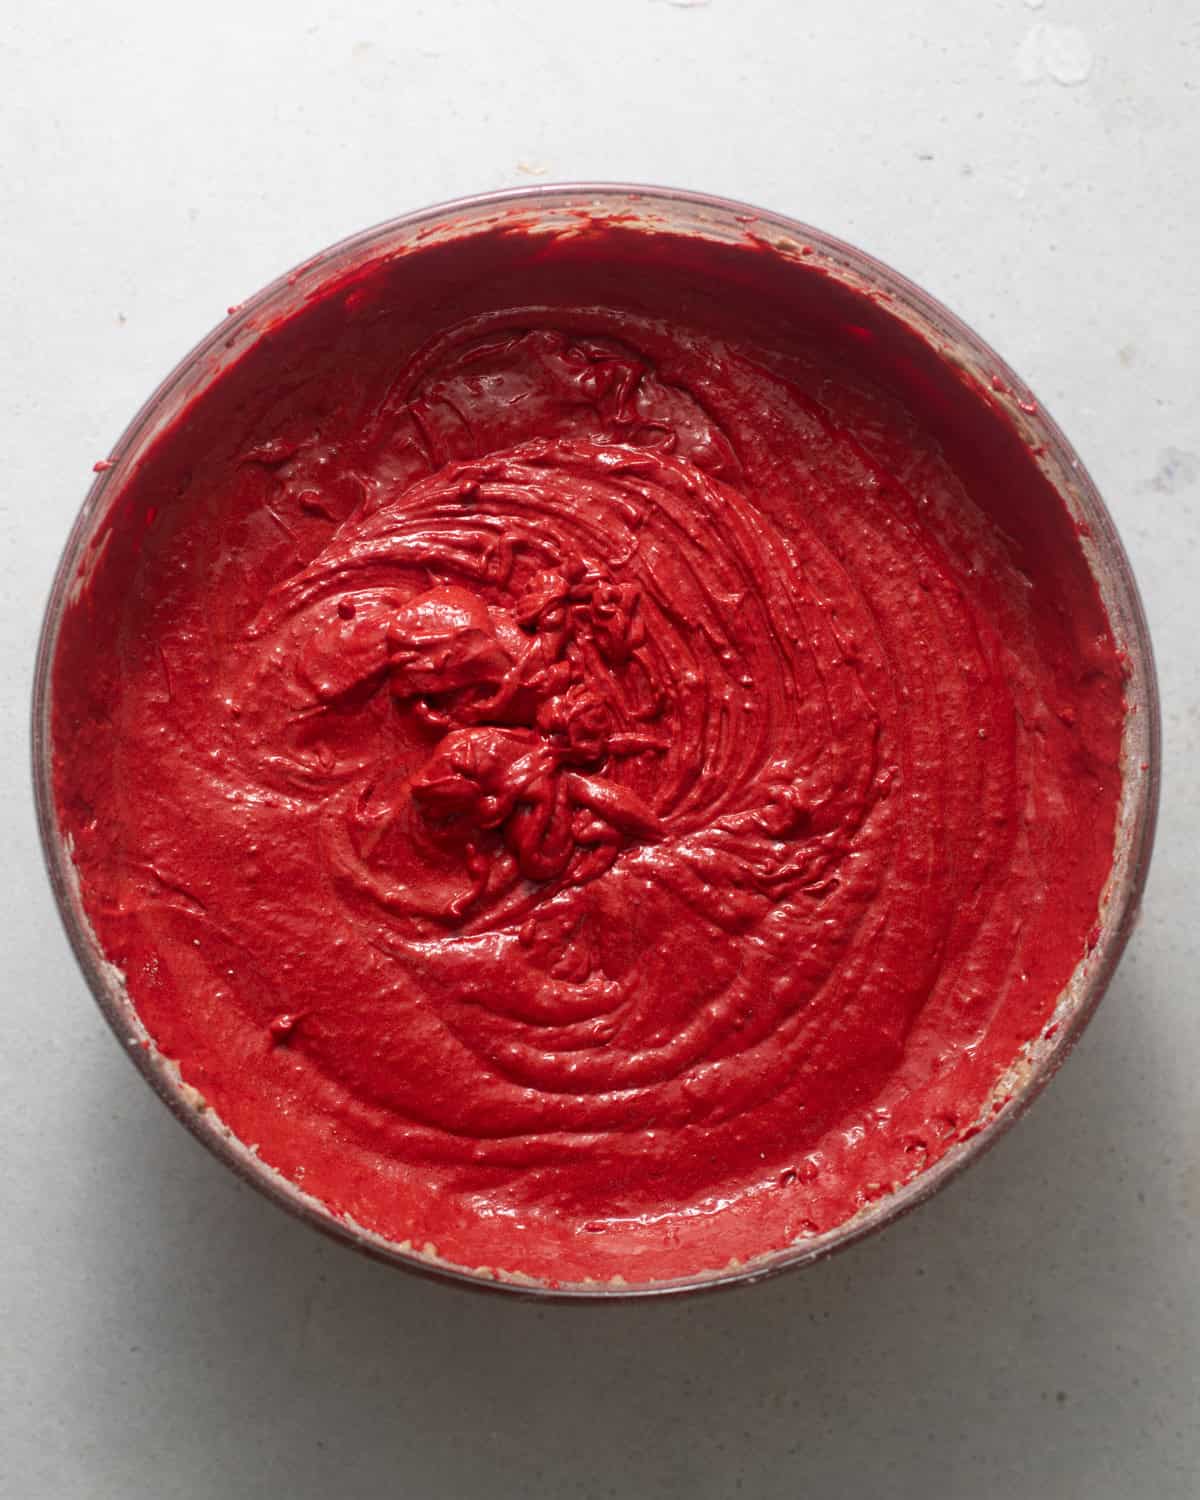
Step 3: Continue to mix until combined and smooth, then add in applesauce and red food dye. Mix until just combined and applesauce is fully incorporated and the red food coloring is evenly distributed. Then add in the flour mixture to the wet ingredients. Mix until combined and smooth. Divide batter evenly amongst the cake pans and bake for 30-35 minutes, until a toothpick inserted in the center of the cake comes out with just a few moist crumbs. Let the cakes cool in the pan for 10 minutes, then flip over into a wire rack to cool completely.
Make the Cream Cheese Frosting and Assemble
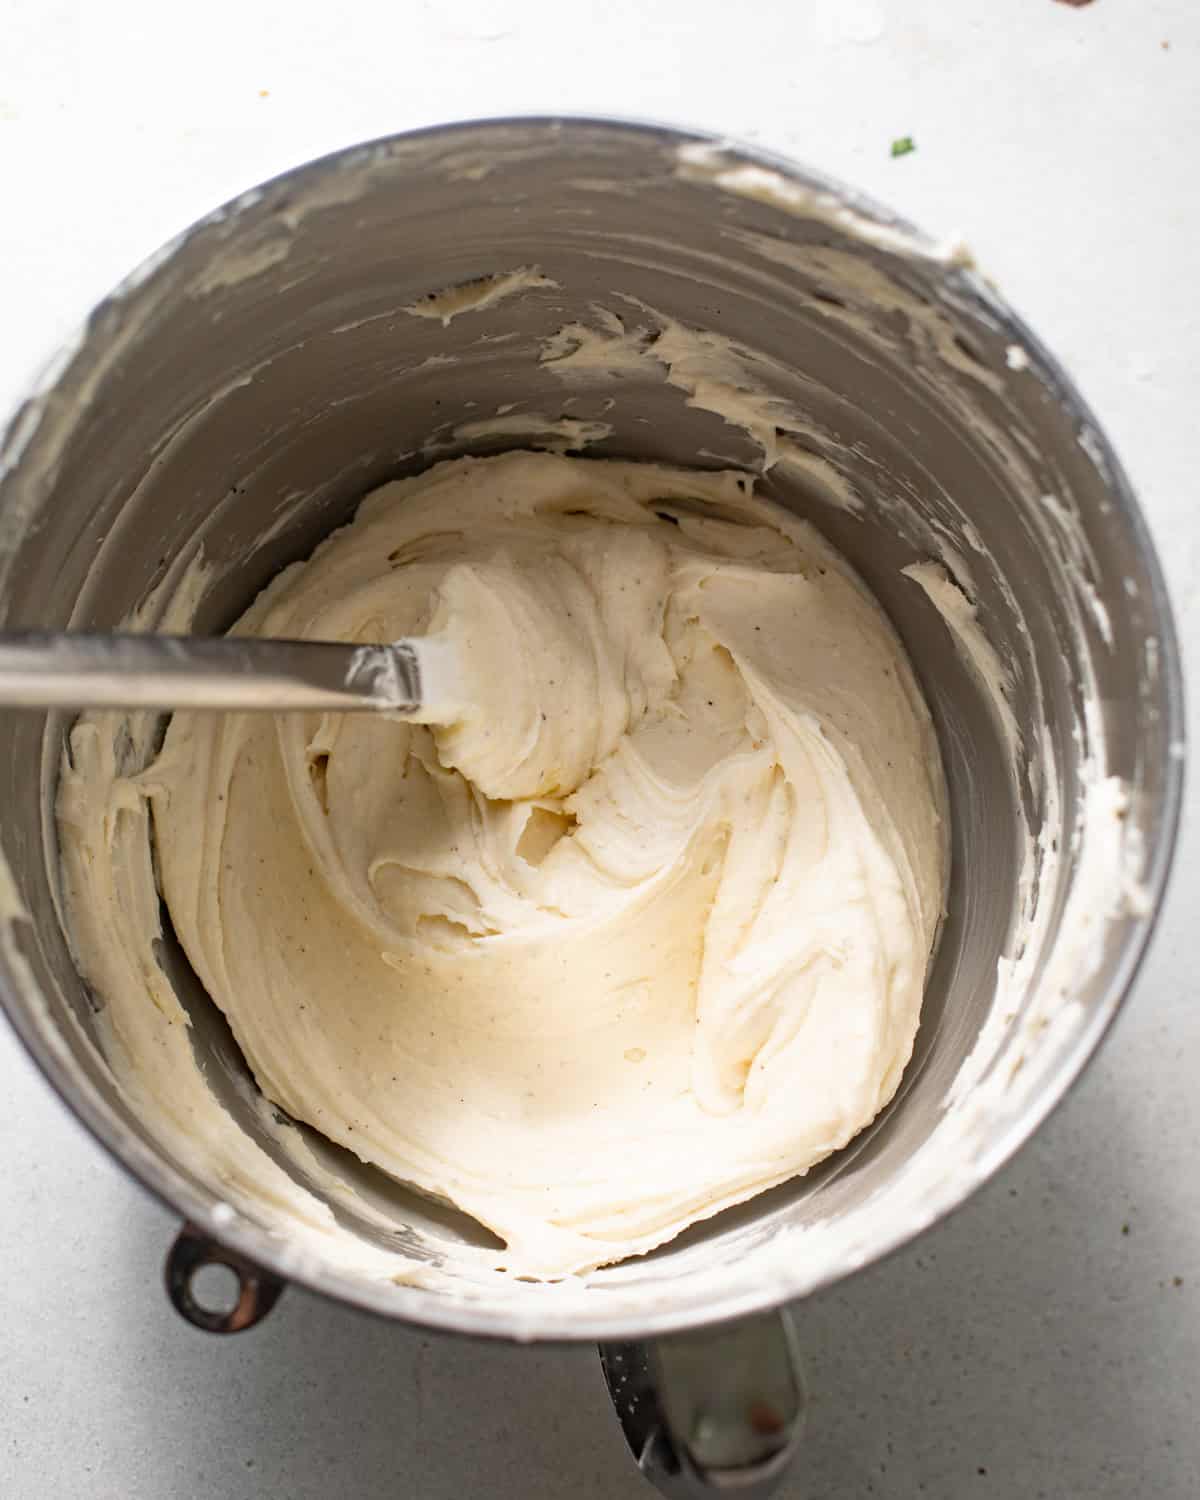
Step 4: While the cakes are cooling, begin making the cream cheese frosting. In the bowl of a stand mixer fitted with the paddle attachment, beat butter for 1 minute on medium speed. Then add in the powdered sugar. Begin mixing on low, then gradually increase to medium speed once all ingredients are combined. Beat for 2 minutes, then add cream cheese and continue to mix for 1-2 minutes on medium speed until smooth.
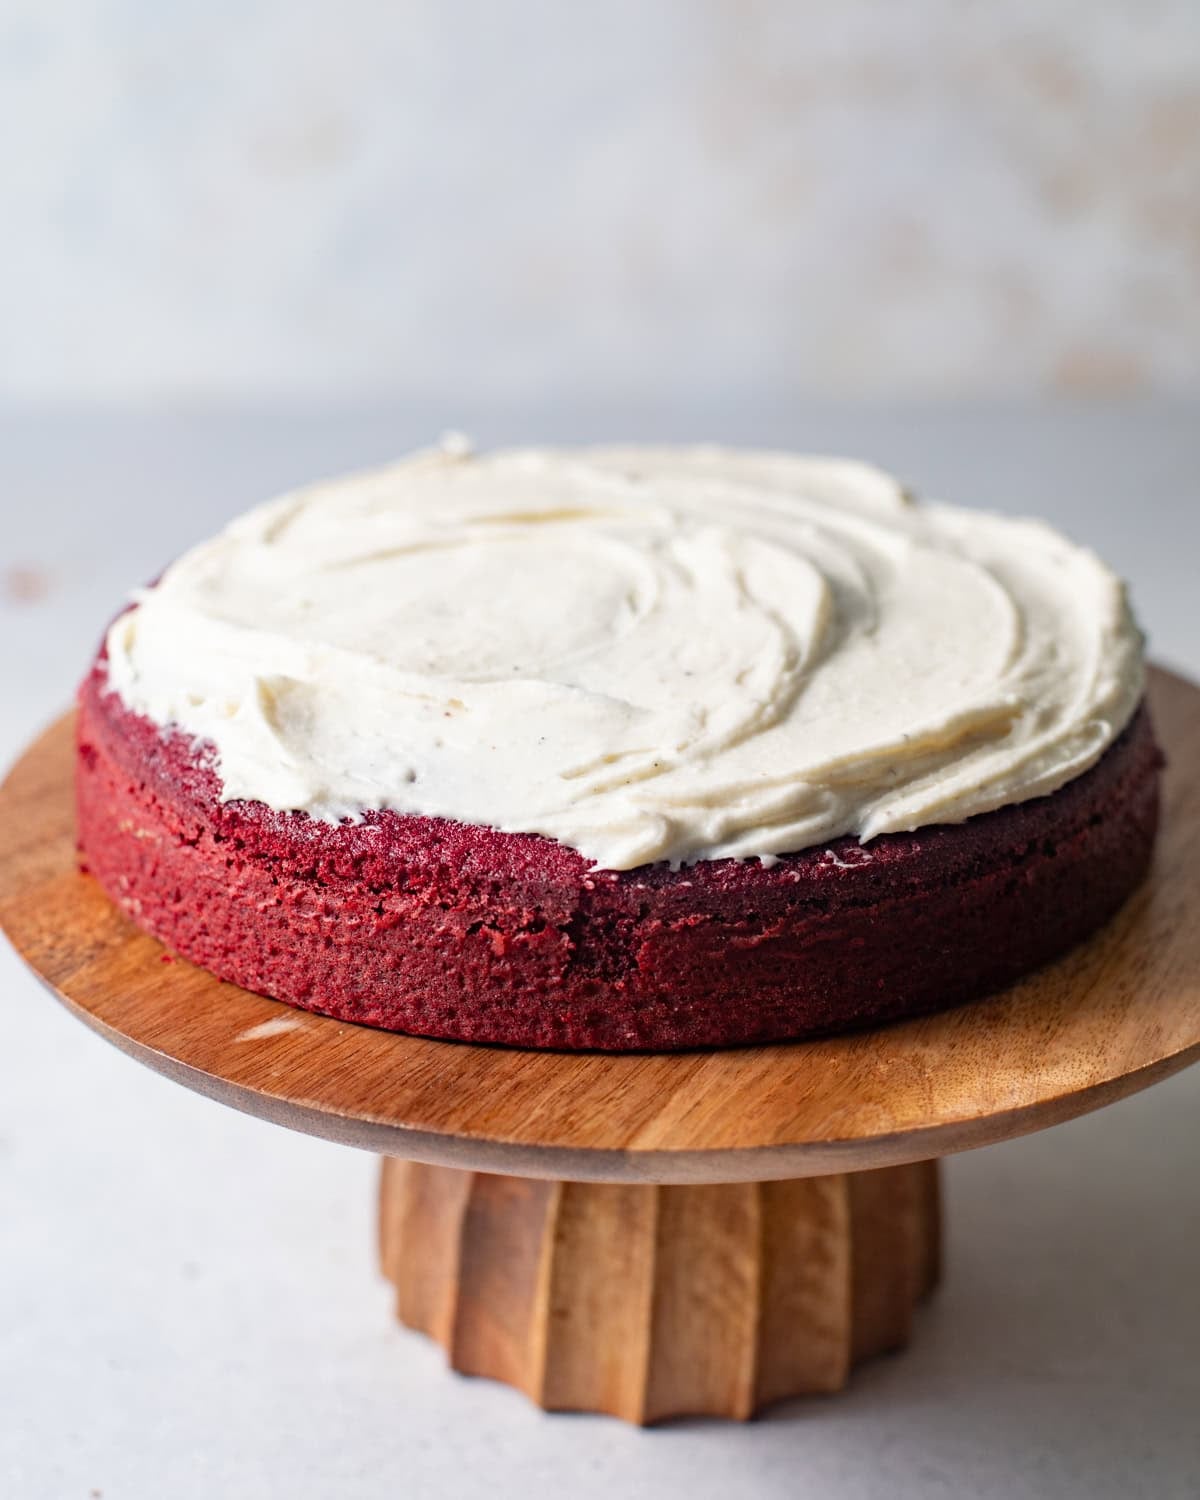
Step 5: Place one of the cooled cakes onto a cake stand. Add a generous layer of frosting on top. Place the second layer on top and repeat.
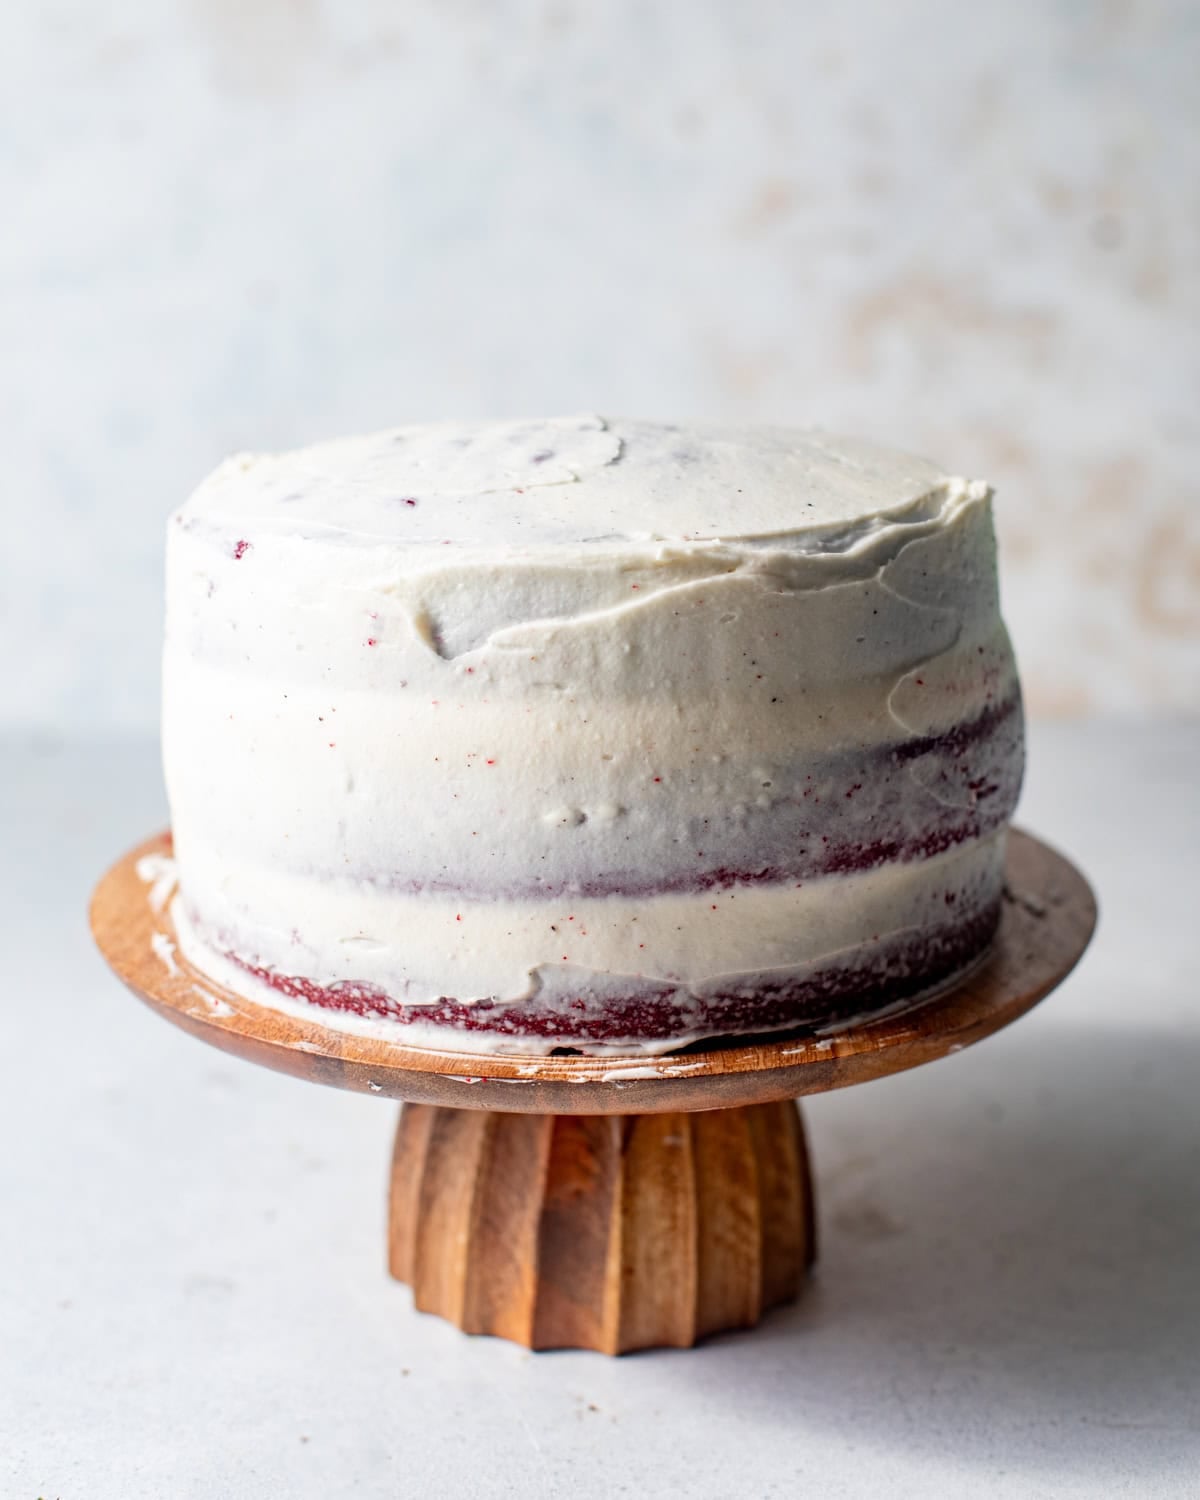
Step 6: Place the third layer on top and add a thin coat of frosting to the outside of the cake then place into the refrigerator for 30 minutes. Add the remainder of the frosting around the cake and serve. Add any leftover frosting to the piping bag and continue to pipe swirls on top of the cake. Refrigerate until ready to serve.
Pro Baking Tips
- Cooling and frosting: Allow the cake to cool in the pan for a few minutes, then transfer it to a wire rack to cool completely before frosting. This prevents the frosting from melting and sliding off the cake.
- Accurate measurements: Use accurate measuring tools, such as a kitchen scale, to ensure precise measurements of both dry and liquid ingredients. Be particularly careful with flour, as too much can lead to a dense and dry cake.
- Room temperature ingredients: Most cake recipes call for room temperature ingredients, such as butter, eggs, and milk. Bringing these ingredients to room temperature allows them to blend together more easily and helps create a smoother batter.
- Avoid opening the oven door: During baking, try to avoid opening the oven door unnecessarily. Frequent temperature fluctuations can affect the cake’s rise and texture.
- Test for doneness: Use a toothpick or cake tester to check if the cake is done. Insert it into the center of the cake; if it comes out clean or with a few crumbs, the cake is ready. If it comes out with wet batter, continue baking for a few more minutes and retest.
Recipe FAQs
Red velvet cake is a cross between a slightly chocolate cake and a vanilla cake. It has a more tangy flavor due to the buttermilk and vinegar added to enhance the taste.
Yes, due to the cream cheese frosting. Red velvet cake is best stored in an airtight container in the refrigerator for up to 4 days.
The taste of red velvet cake is tangy, subtly chocolate balanced by a creamy cream cheese frosting giving the cake a deliciously sweet and smooth yet slightly tart flavor.
The vinegar aids in enhancing the color of the red food coloring as well as preventing gluten formation, allowing the cake to be both bright red as well as moist and tender.
Substitute one cup of milk with one tablespoon of lemon juice or vinegar to make buttermilk. For a dairy free/vegan alternative, use one cup of your favorite milk substitute with one tbsp or lemon juice or vinegar. Mix it together and let it sit for 5-10 minutes.
More Red Velvet Recipes

Desserts
Red Velvet Pound Cake

Brownies & Bars
Red Velvet Brownies

Desserts
Red Velvet Cookies

Desserts
Black Velvet Cake
Want more delicious and beautiful recipes? Subscribe to my newsletter to receive the latest seasonal creations as soon as they’re released!
If you make this recipe, please leave a star rating on the recipe card and comment below! You can also tag @BritneyBreaksBread on Instagram and hashtag #britneybreaksbread so I can celebrate your beautiful creations!
Red Velvet Cake

Equipment
- Offset Spatula (optional)
- Piping Bags (optional)
- 1M Piping Tip (optional)
Ingredients
Red Velvet Cake
- 3 cups (375 g) Cake Flour
- 5 tbsps (28 g) Unsweetened Cocoa Powder
- 1 1/2 tsp Espresso Powder, (optional)
- 1 tsp (4) Baking Soda
- 1 tsp (6) Kosher Salt
- 3/4 cup (168 g) Salted Butter, (room temperature)
- 3/4 cup (168 g) Vegetable Oil
- 2 1/4 cups (450 g) Granulated Sugar
- 4 Large (200 g) Eggs
- 1 1/2 tbsps (20) Vanilla Extract
- 1 tbsp (g) White Vinegar
- 1 1/2 tsp (36) Butter Vanilla Emulsion, (or butter extract)
- 3/4 cup (240 g) Buttermilk, (room temperature)
- 1/4 cup (60 g) Sour Cream, (room temperature)
- 1 cup (256 g) Applesauce, (room temperature)
- 2 tbsp (15 g) Red Gel Food Coloring
Cream Cheese Frosting
- 1 1/2 cups (227 g) Salted Butter, (room temperature)
- 5 cups (600 g) Powdered Sugar
- 12 oz (340 g) Cream Cheese, (room temperature)
- 1 tbsp (8) Meringue Powder, (optional)
- 2 tbsp (g) Sour Cream
- 1 tbsp (13 g) Vanilla Bean Paste , (or vanilla extract)
- Pinch of Salt
Instructions
Prepare the Cake Batter
- Preheat the oven to 350 degrees F. Spray three 8 inch cake pans with nonstick baking spray. Set aside.
- In a large mixing bowl, whisk together cake flour, cocoa powder, espresso powder, baking soda and kosher salt. Whisk together and set aside. 3 cups Cake Flour 5 tbsps Unsweetened Cocoa Powder 1 1/2 tsp Espresso Powder 1 tsp Baking Soda 1 tsp Kosher Salt
- In the bowl of a stand mixer fitted with the paddle attachment, combine room temperature butter, oil, and sugar. Cream everything together until smooth, about 2-3 minutes, then add eggs, one at a time, ensuring that each egg is fully incorporated prior to adding the next. Add in vanilla extract, butter vanilla emulsion, vinegar, buttermilk, and sour cream. Continue to mix until combined and smooth, then add in applesauce and red food dye. Mix until just combined and applesauce is fully incorporated and the red food coloring is evenly distributed. (If the batter breaks, this is totally normal, it'll come back together when the dry ingredients are added) 3/4 cup Salted Butter 3/4 cup Vegetable Oil 2 1/4 cups Granulated Sugar 4 Large Eggs 1 1/2 tbsps Vanilla Extract 1 1/2 tsp Butter Vanilla Emulsion 1 tbsp White Vinegar 3/4 cup Buttermilk 1/4 cup Sour Cream 1 cup Applesauce 2 tbsp Red Gel Food Coloring
- Scrape down the sides of the bowl and add in the flour mixture to the wet ingredients. Mix until combined, about 20-30 seconds.
- Pour the batter evenly amongst the cake pans and bake for 30-35 minutes, until a toothpick inserted in the center of the cake comes out with just a few moist crumbs. Let the cakes cool in the pan for 10 minutes, then flip over into a wire rack to cool completely.
Make the Cream Cheese Frosting and Assemble and Ice the Cakes
- While the cakes are cooling, begin making the cream cheese frosting. In the bowl of a stand mixer fitted with the paddle attachment, beat butter for 1 minute on medium speed. Then add in the powdered sugar, sour cream, and vanilla bean paste. Begin mixing on low, then gradually increase to medium speed once all ingredients are combined. 1 1/2 cups Salted Butter 5 cups Powdered Sugar 2 tbsp Sour Cream 1 tbsp Vanilla Bean Paste
- Scrape down the sides of the bowl and beat for 2 minutes, then add cream cheese and meringue powder and a pinch of kosher salt. Continue to mix for 1-2 minutes on medium speed until smooth. 12 oz Cream Cheese 1 tbsp Meringue Powder
- Place one of the cooled cakes onto a cake stand. Add a generous layer of frosting on top. Place the second layer on top and repeat. Place the third layer on top and add a thin coat of frosting to the outside of the cake then place into the refrigerator for 30 minutes.
- Add the remainder of the frosting around the cake and serve.
Video
Notes
- Buttermilk substitute: to make buttermilk, all you need are milk and lemon juice or vinegar. 1 cup of milk + 1 tbsp of lemon juice or vinegar. Combine the two, let it sit for 5-10 minutes and you’ve got buttermilk.
- Dairy Free Option: use your favorite dairy free milk and add a tablespoon of vinegar to make a nondairy buttermilk. For the frosting, use your favorite non-dairy cream cheese.
- Gluten Free Option: use a 1-to-1 gluten free flour in place of all purpose flour. Use the same quantities listed in the recipe card.
- Vegan Option: follow the dairy free option and also use your favorite vegan butter as well as your favorite egg replacement. I recommend using flax eggs. For this recipe, that would be 4 tbsps of flaxseeds and 10 tbsps of water.
- Accurate measurements: Use accurate measuring tools, such as measuring cups and spoons, to ensure precise measurements of both dry and liquid ingredients. Be particularly careful with flour, as too much can lead to a dense and dry cake.
- Room temperature ingredients: Most cake recipes call for room temperature ingredients, such as butter, eggs, and milk. Bringing these ingredients to room temperature allows them to blend together more easily and helps create a smoother batter.
- Avoid opening the oven door: During baking, try to avoid opening the oven door unnecessarily. Frequent temperature fluctuations can affect the cake’s rise and texture.
- Test for doneness: Use a toothpick or cake tester to check if the cake is done. Insert it into the center of the cake; if it comes out clean or with a few crumbs, the cake is ready. If it comes out with wet batter, continue baking for a few more minutes and retest.
- Cooling and frosting: Allow the cake to cool in the pan for a few minutes, then transfer it to a wire rack to cool completely before frosting. This prevents the frosting from melting and sliding off the cake.
Nutrition
Nutrition information is automatically calculated, so should only be used as an approximation.


I finally a found red velvet cake recipe that tastes like my aunt. Every since I was a little girl I’ve been trying to mimic her recipe and could until I tried Brittney’s recipe. My name is also Brittany and Every one I’ve met with this same name has something special about theme, & MS. Brittney share your love & creativity for food.
Hi Brittany, thank you for your kind words! I really appreciate it, I’m so glad that you love this cake as much as I do!
I’ve made this recipe twice, soooo incredibly moist and delicious. This is my new go-to red velvet recipe. I separated my batter into 3 8″ cake pans and found that 29min in the oven works best for my desired texture. AMAZING!
thank you so much!!
I made this cake for my neighbor’s 85th birthday party and it was a hit!! So much in fact I need to make another one because we had none left over. It did take me longer than 15 minutes to prepare, which I am certain is my own fault. I wanted to use the scale to measure the ingredients as grams instead of using a measuring cup. Boy oh boy, my measuring cups are not correct at all!! I wound up measuring everything more than twice since there was such a discrepancy! I used three identical cake pans and the scale to divide up the batter to make sure the layers were the same size, worked out great. I used the cake pan wraps that you soak in water to make sure the layers were flat, so I didn’t have to trim them. I thought I saw you mention you can make this cake as a sheet cake, but I couldn’t find it again. If there is a recipe for a sheet cake, please let me know where to find it. I wanted to post a picture of the cake since it turned out so pretty, but I didn’t see a way to do that.
Thank you so much for a wonderful recipe that made such a delicious cake.
I’m excited to make this cake. I’m curious to know what the apple sauce and sour cream add to the cake
Hi! The apple sauce adds a ton of moisture and the sour cream adds a slight tang. I hope that you love this recipe!
this recipe is amazing. thank you for sharing
Thanks so much!
I have been looking for a good red velvet cake to make for years. All of the others always seem too dry or too moist, but this cake was perfect. It was so soft and flavorful – the perfect balance of chocolate and vanilla and the cream cheese frosting was SO good. A great compliment to the cake. I recommend this recipe!
I’m so flattered, thank you!
I am so excited to make this for my nephew’s graduation party this weekend. Would you be able to say how tall the cake is about so I could buy the right cake storage lid thing? =)
Hi Cesi, I didn’t measure the cake but I would say that it’s at least 9 inches! I hope that helps!
I tried this cake over the weekend and man, it was incredible! THE CAKE WAS SO MOIST AND TENDER and the cream cheese frosting made it even better. Also, love the photos, this is the prettiest red velvet cake I’ve ever seen.
Thank you so much Adam!!