
This post may contain affiliate links. Please see our disclosure policy.
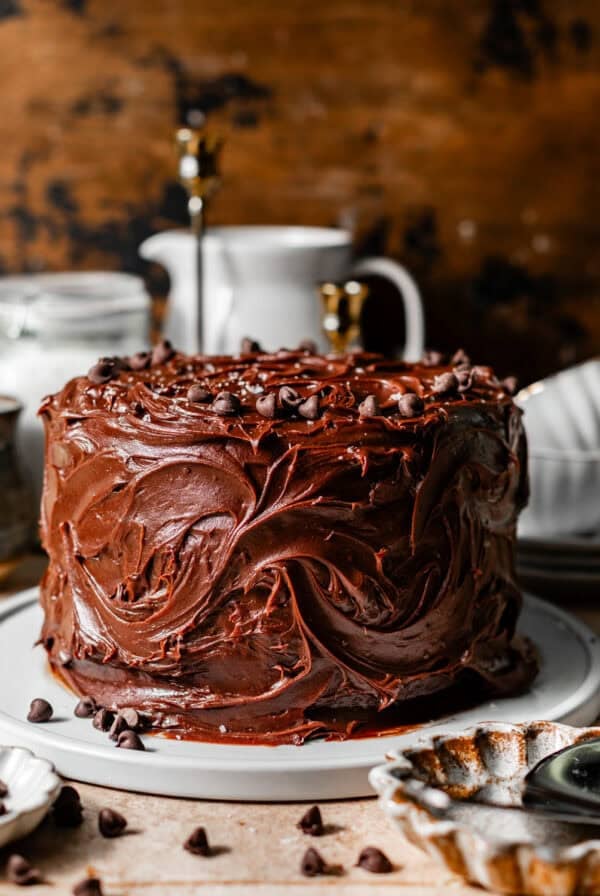
Chocolate Mousse Pie is a silky, cloud-like dream with a rich, chocolatey filling nestled in a crisp Oreo crust! Topped with fluffy whipped cream and chocolate curls, every bite is a luscious blend of smooth, airy mousse – it’s pure chocolate bliss!
For more pie recipes, make my turtle pie and easy key lime pie! Also, try out the cake version of this recipe with my chocolate mousse cake!

We’re making the creamiest, most luxurious chocolate mousse pie – completely from scratch. No shortcuts, no pudding mix, just pure, homemade goodness. It’s rich, creamy, and irresistibly decadent—basically a chocolate dream come true.
Make this for the chocolate lovers in your life, and they’ll love you forever!
It’s almost a no-bake chocolate mousse pie recipe—we simply bake the Oreo crust for 12 minutes to give it that perfect crisp texture. The rest of the time, it’s all about stovetop magic to create the silkiest, most decadent chocolate mousse filling. Then, just pop it in the fridge and let the magic happen!
And don’t worry—I’ll walk you through every step, so you’ll nail it like a pro!
Instead of a traditional pie dish, we’re using a springform pan for extra ease. This makes slicing a breeze and helps form the most delicious chocolate cookie crust. Once the filling is perfectly set, pile on fluffy whipped cream and maybe even some chocolate shavings for the ultimate finishing touch.
One bite, and you’ll be hooked!
Table of Contents
Chocolate Mousse Pie Ingredients

(full list of ingredients can be found in the recipe card)
- Egg Yolks are the glue that allow the pie to set. They also add richness and creaminess, creating a smooth, velvety texture. Save those egg whites to make a meringue topping or even meringue cookies!
- Whole Milk and Heavy Whipping Cream are the base of the chocolate mousse filling. We’re essentially making a chocolate cremeux, which is a type of mousse used typically for ice cream. Instead of whipping it, when chilled and set in the fridge, you get this beautifully creamy, smooth texture that is just sinfully good.
- Make sure to use Bittersweet Chocolate or Dark Chocolate with 60%-70% cocoa. Anything above that will be too bitter and anything below 60% is essentially semi-sweet chocolate which will make the pie far too sweet and cause the mousse not to set as well. I used guittard’s baking bars (it says that its semisweet chocolate, however, I’m less concerned about the name and more about the cocoa percentage)
- Sugar sweetens the mousse and balances the bitterness of the chocolate.
- Unsalted butter adds a silky richness and enhances the mouthfeel of the mousse layer. We also use butter in the chocolate crust to act as a binder to hold the crust together.
- Vanilla bean paste or vanilla extract
- Oreo Cookies go in the pie crust – it’s the perfect compliment to the rich chocolate flavor. You can also use a graham cracker crust too, just use the recipe from my chocolate chip cheesecake.
Substitutions and Variations
- For even deeper chocolate flavor, add a little espresso powder to the mousse, about a 1/2 tsp is perfect!
- If you love nutella lover like me (see my nutella beignets), you probably love hazelnuts too. Adding about a 1/4 cup of hazelnuts to the crust and a layer of nutella makes this chocolate pie recipe DIVINE. Try it, you won’t regret it.
- Top with fresh raspberries or strawberries for
How to make Chocolate Mousse Pie

Step 1: Make the oreo cookie crust – Preheat the oven to 350 degrees F. Combine oreo cookies and melted butter in a food processor and blend until fine crumbs form. Line the bottom of a springform pan with parchment paper. Firmly press the oreo cookie crumbs on the sides and bottom of the pan. Bake for 12 minutes. Set aside to cool.

Step 2: In a large mixing bowl, whisk together egg yolks, sugar, and salt.

Step 3: Add heavy cream and milk to a medium saucepan over low heat. Warm for 5-7 minutes, until warm to the touch – do not bring to a boil. Slowly begin adding the hot cream to the egg mixture, about 1/2 cup at a time, whisking constantly to temper the eggs.

Step 4: Once all of the cream is added, pour the mixture back into the pan and cook over medium low heat for about 10-15 minutes, until it thickens slightly, enough to coat the back of a spoon.

Step 5: Remove the pan from the heat and add the chopped chocolate, butter, and vanilla bean paste. Let the mixture sit for about 2 minutes, then whisk together until just combined. Pour into a food processor (or use an immersion blender) and blend until smooth and combined – about 30 seconds to a 1 minute.

Step 6: Pour the chocolate mixture into the oreo cookie crust. Place into the refrigerator to set for at least 8 hours, ideally 12 hours. Before serving, whip together cold heavy cream, powdered sugar, vanilla bean paste, and a little salt until stiff peaks form. Add on top of the pie and top with chocolate shavings.
Tips for making Chocolate Pie
This is a fairly easy recipe, but it’s also easy to mess up. Make sure to follow each step to the “T”!
- Use high-quality chocolate (at least 60% cacao) for the best flavor and smoothest texture. Avoid chocolate chips since they contain stabilizers that can affect the mousse consistency.
- If you have difficulty separating the raw eggs, it’s easier to do when the eggs are cold.
- When tempering the egg yolks, slowly pour in the warm cream, whisking constantly to prevent eggs from scrambling.
- For perfect slices, dip your knife in hot water, wipe dry, and slice with a gentle sawing motion.

Recipe FAQs
Yes, chocolate mousse pie can be made without raw eggs by using alternatives like whipped cream, gelatin, or silken tofu to achieve a similar light and airy texture. However, I would not recommend making this particular swap for this recipe.
At least 6-8 hours, preferably 24 hours. It’s the perfect make ahead dessert.
The mouse is gluten free, but the oreo cookie crust is not. You can simply swap out the oreo cookies for gluten free oreos to make a gluten free alternative.
Chocolate mousse pie should be stored covered in the refrigerator for up to 3–4 days to maintain its freshness and texture. For longer storage, it can be frozen for up to 2 months, but should be thawed in the fridge before serving to prevent texture changes.
To prevent the mouse from becoming grainy, I use a food processor to ensure the melted chocolate fully emulsifies into the cream mixture. This step is crucial to achieving that smooth, creamy texture.
More Chocolate Recipes


Want more delicious and beautiful recipes? Subscribe to my newsletter to receive the latest seasonal creations as soon as they’re released!
If you make this recipe, please leave a star rating on the recipe card and comment below! You can also tag @BritneyBreaksBread on Instagram and hashtag #britneybreaksbread so I can celebrate your beautiful creations!
Chocolate Mousse Pie

Ingredients
Oreo Cookie Crust
- 28 Oreo Cookies
- 6 tbsp Unsalted Butter, (melted)
- Pinch Kosher Salt
Chocolate Mousse Layer
- 1 1/2 cup Whole Milk
- 1 1/2 cup Heavy Cream
- 5 Egg Yolks
- 1/2 cup Sugar
- 1/2 tsp Kosher Salt
- 1 tbsp Vanilla Bean Paste, (or extract)
- 12 oz Dark Chocolate, (at least 60%-70% cocoa), chopped
- 2 tbsp Unsalted Butter
Whipped Cream Topping
- 1 cup Heavy Cream, (cold)
- 1/3 cup Powdered Sugar
- 2 tsp Vanilla Bean Paste, (or extract)
- Pinch Kosher Salt
Instructions
- Make the oreo cookie crust – Preheat the oven to 350 degrees F. Combine oreo cookies, melted butter, and kosher salt in a food processor and blend until fine crumbs form. Line the bottom of a springform pan with parchment paper. Firmly press the oreo cookie crumbs on the sides and bottom of the pan. Bake for 12 minutes. Set aside to cool.
- Add heavy cream and milk to a medium saucepan over low heat. Warm for 5-7 minutes, until warm to the touch – do not bring to a boil.
- In a large mixing bowl, whisk together egg yolks, sugar, and salt. Slowly begin adding the hot cream to the egg mixture, about 1/2 cup at a time, whisking constantly to prevent the eggs from scrambling. Once all of the cream is added, pour the mixture back into the pan and cook over medium low heat for about 10-15 minutes, stirring frequently, until it thickens slightly, enough to coat the back of a spoon.
- Remove the pan from the heat and pour into a heatproof bowl. Add the chopped chocolate, butter, and vanilla bean paste. Let the mixture sit for about 2 minutes, then whisk together until just combined. Pro tip: if you see any lumps, strain through a fine mesh sieve.
- Pour into a food processor (or use an immersion blender) and blend until smooth and combined – about 30 seconds to a 1 minute. Pour the chocolate mixture into the oreo cookie crust. Place into the refrigerator to set for at least 8 hours, ideally 12 hours. No need to cover with plastic wrap unless keeping in the refrigerator for more than 2 days.
- Before serving, whip together cold heavy cream, powdered sugar, vanilla bean paste, and a little salt until stiff peaks form. Add on top of the pie and top with chocolate shavings.
Notes
- Use high-quality chocolate (at least 60% cacao) for the best flavor and smoothest texture. Avoid chocolate chips since they contain stabilizers that can affect the mousse consistency.
- If you have difficulty separating the raw eggs, it’s easier to do when the eggs are cold.
- When tempering the egg yolks, slowly pour in the warm cream, whisking constantly to prevent eggs from scrambling.
- For perfect slices, dip your knife in hot water, wipe dry, and slice with a gentle sawing motion.
Nutrition
Nutrition information is automatically calculated, so should only be used as an approximation.


Will using a traditional pie dish affect the way this recipe turns out at all, if I don’t have a spring form?
I haven’t tested this recipe in a traditional pie dish, but if I had to chime in, I would be concerned that there’s too much filling. Please report back and let me know how it goes!
I made this recipe for my son’s birthday- it was so delicious and looked like it came from a 5-Starr restaurant! I used gf Oreos and stabilized the whipped cream on top layer with 2 t of instant vanilla pudding, then added chocolate shavings. I used Lindt chocolate bars. It turned out perfect! I highly recommend this recipe no matter your skill level- its surprisingly easy for such amazing results!
I’m so happy that you loved this recipe, thank you for your feedback!
Can this be made with milk chocolate instead of dark?
I haven’t tested this recipe with milk chocolate, but I imagine the recipe would be extremely sweet. If you try it out, let me know!
This recipe is pure magic! Perfect smooth texture, not overly sweet, and the whipped cream takes it over the top.
Thanks so much!
Hi!
I’m just about to attempt this!
Do you release it from the tin before serving?
Thank you!
Hi! Yes after it’s set and it’s finished, you should release it from the tin to cut it. I hope that you love it!
If you are a dark chocolate and decadent dessert lover 5his pie is for you! The filling is so rich, silky and smooth. It pairs nicely with the buttery cookie crust. Easy to make and sets up perfectly!
I’m not much of a baker but I wanted to try this recipe because it looked so good! It exceeded my expectations. The filling was very smooth, chocolatey and sweet but not overbearing. It had the perfect balance of flavors. I made this for Easter brunch and it was a big hit! Thx for the recipe!
On the Oreo crust – do you use just the cookie, or the cream filling as well.
Hi! You use the entire cooking, no need to remove the filling. I hope this helps!
The pie has been in the fridge for about 15 hours but it still seems very liquidy/jelly. What is it supposed to look/feel like?
Hi! The filling should be set by about 4 hours (visual cues – it should not move when shaken and when pressed, you finger should leave an indent). I like to refrigerate it for at least 8 hours so that it’s stable at room temperature but it. Did you follow the instructions or change the recipe in any way?
I used an 8in pan and didn’t use a food processor or immersion blender at the end.
Ok so using an 8 inch pan will cause it to take a lot longer to set because it’s a smaller container with a lot of filling (a 9-inch pan is wider) and not using the immersion blender/food processor means it may not have been emulsified enough. Please be sure to complete every step of the recipe as directed. If you make changes to the recipe, it may not turn out the same exact way. Has it set yet?
sadly not yet 😔
Thank you 🙏
Wow👏 👏 👏 incredibly silky… like 🤯 . The sweetness was perfect 👌 and the texture is truly remarkable. It’s like nothing I’ve ever had before. All my chocolate dreams are wrapped up in this chocolate mousse.
Thanks, Kerri!
This cake is SO addicting! I’ve had one slice and it was hard to stop
Thanks so much, Julie!